

GZCTF靶场的搭建以及上题
如果只是想看怎么上题,直接看最下面,前言和部署可以不看.
前言
为什么选用GZCTF?
CTFd太难搭了
刚开始是用的github上面最新版的ctfd和whale,然后进入whale的配置页面报docker api和frp api的错误,修了一天然后修好了,传一道题发现启动不了,然后就去回滚老版本,发现很多依赖比较奇怪,然后最后老版本能跑了,但是题目卡片点击后无响应
逛B站评论区发现有个叫GZ::CTF Project Documentation的看着部署挺简单,就试了一下
UI也比CTFd好看
Docker
做一些Docker的前置配置工作
配置镜像源
不配置会导致pull很慢,而且大概率pull不下来
nano /etc/docker/daemon.json复制粘贴以下
{
  "registry-mirrors": [
    "https://docker.156046.xyz",
    "https://docker.xuanyuan.me"
  ]
}
https://docker.156046.xyz 是我自己搭的,原理可参阅通过 cloudflare 白嫖个人 docker 镜像加速服务_cloudfare docker-CSDN博客
配置代理
不配置会导致docker login不上去
配置代理软件
我这边的linux环境都是在云服务器上,无UI,如果大家用虚拟机的话就方便了(能直接用v2rayn和Clash的UI版本)
v2rayn的GitHub:Releases · 2dust/v2rayN
clash的Github:Releases · clash-verge-rev/clash-verge-rev
我这边用的是v2ray(每个人喜好不同,有不同的选择,如果配好了代理可以看下面)
Releases · v2fly/v2ray-core 下载linux-x64即可
如果要运行还需要config.json
在windows端v2rayn更新订阅链接后选择其中一个导出为config.json
因为我是用的是http代理,所以还要打开导出的json编辑一下
比如导出的文件是这样的:
{
  "log": {
    "loglevel": "warning"
  },
  "dns": {
    "hosts": {
      "dns.google": "8.8.8.8",
      "proxy.example.com": "127.0.0.1"
    },
    "servers": [
      {
        "address": "1.1.1.1",
        "domains": [
          "geosite:geolocation-!cn"
        ],
        "expectIPs": [
          "geoip:!cn"
        ]
      },
      {
        "address": "223.5.5.5",
        "domains": [
          "geosite:cn"
        ],
        "expectIPs": [
          "geoip:cn"
        ]
      },
      "8.8.8.8",
      "https://dns.google/dns-query"
    ]
  },
  "inbounds": [
    {
      "tag": "socks",
      "port": 10808,
      "listen": "127.0.0.1",
      "protocol": "socks",
      "sniffing": {
        "enabled": true,
        "destOverride": [
          "http",
          "tls"
        ],
        "routeOnly": false
      },
      "settings": {
        "auth": "noauth",
        "udp": true,
        "allowTransparent": false
      }
    }
  ],
  "outbounds": [
    {
      "tag": "proxy",
      "protocol": "vless",
      "settings": {
        "vnext": [
          {
            "address": "103.21.244.67",
            "port": 443,
            "users": [
              {
                "id": "f179100e-a5c6-48c7-b691-c8e5b15e5c01",
                "email": "t@t.tt",
                "security": "auto",
                "encryption": "none"
              }
            ]
          }
        ]
      },
      "streamSettings": {
        "network": "ws",
        "security": "tls",
        "tlsSettings": {
          "allowInsecure": true,
          "serverName": "www1.485566.xyz",
          "fingerprint": "random"
        },
        "wsSettings": {
          "path": "/?ed=2560",
          "host": "www1.485566.xyz",
          "headers": {
            "Host": "www1.485566.xyz"
          }
        }
      },
      "mux": {
        "enabled": false,
        "concurrency": -1
      }
    },
    {
      "tag": "direct",
      "protocol": "freedom"
    },
    {
      "tag": "block",
      "protocol": "blackhole"
    }
  ],
  "routing": {
    "domainStrategy": "AsIs",
    "rules": [
      {
        "type": "field",
        "inboundTag": [
          "api"
        ],
        "outboundTag": "api"
      },
      {
        "type": "field",
        "outboundTag": "proxy",
        "domain": [
          "domain:googleapis.cn",
          "domain:gstatic.com"
        ]
      },
      {
        "type": "field",
        "port": "443",
        "network": "udp",
        "outboundTag": "block"
      },
      {
        "type": "field",
        "outboundTag": "direct",
        "ip": [
          "geoip:private"
        ]
      },
      {
        "type": "field",
        "outboundTag": "direct",
        "domain": [
          "geosite:private"
        ]
      },
      {
        "type": "field",
        "outboundTag": "direct",
        "ip": [
          "223.5.5.5",
          "223.6.6.6",
          "2400:3200::1",
          "2400:3200:baba::1",
          "119.29.29.29",
          "1.12.12.12",
          "120.53.53.53",
          "2402:4e00::",
          "2402:4e00:1::",
          "180.76.76.76",
          "2400:da00::6666",
          "114.114.114.114",
          "114.114.115.115",
          "114.114.114.119",
          "114.114.115.119",
          "114.114.114.110",
          "114.114.115.110",
          "180.184.1.1",
          "180.184.2.2",
          "101.226.4.6",
          "218.30.118.6",
          "123.125.81.6",
          "140.207.198.6",
          "1.2.4.8",
          "210.2.4.8",
          "52.80.66.66",
          "117.50.22.22",
          "2400:7fc0:849e:200::4",
          "2404:c2c0:85d8:901::4",
          "117.50.10.10",
          "52.80.52.52",
          "2400:7fc0:849e:200::8",
          "2404:c2c0:85d8:901::8",
          "117.50.60.30",
          "52.80.60.30"
        ]
      },
      {
        "type": "field",
        "outboundTag": "direct",
        "domain": [
          "domain:alidns.com",
          "domain:doh.pub",
          "domain:dot.pub",
          "domain:360.cn",
          "domain:onedns.net"
        ]
      },
      {
        "type": "field",
        "outboundTag": "direct",
        "ip": [
          "geoip:cn"
        ]
      },
      {
        "type": "field",
        "outboundTag": "direct",
        "domain": [
          "geosite:cn"
        ]
      }
    ]
  }
}
要在socks配置后面加上http
{
      "tag": "socks",
      "port": 10808,
      "listen": "127.0.0.1",
      "protocol": "socks",
      "sniffing": {
        "enabled": true,
        "destOverride": [
          "http",
          "tls"
        ],
        "routeOnly": false
      },
      "settings": {
        "auth": "noauth",
        "udp": true,
        "allowTransparent": false
      }
    }
改成下面这样
{
      "tag": "socks",
      "port": 10808,
      "listen": "127.0.0.1",
      "protocol": "socks",
      "sniffing": {
        "enabled": true,
        "destOverride": [
          "http",
          "tls"
        ],
        "routeOnly": false
      },
      "settings": {
        "auth": "noauth",
        "udp": true,
        "allowTransparent": false
      }
    },
    {
      "tag": "http",
      "port": 10809,
      "listen": "127.0.0.1",
      "protocol": "http",
      "settings": {
        "timeout": 360
      }
    }
完整版(仅作示例,不具有可用性)
{
  "log": {
    "loglevel": "warning"
  },
  "dns": {
    "hosts": {
      "dns.google": "8.8.8.8",
      "proxy.example.com": "127.0.0.1"
    },
    "servers": [
      {
        "address": "1.1.1.1",
        "domains": [
          "geosite:geolocation-!cn"
        ],
        "expectIPs": [
          "geoip:!cn"
        ]
      },
      {
        "address": "223.5.5.5",
        "domains": [
          "geosite:cn"
        ],
        "expectIPs": [
          "geoip:cn"
        ]
      },
      "8.8.8.8",
      "https://dns.google/dns-query"
    ]
  },
  "inbounds": [
    {
      "tag": "socks",
      "port": 10808,
      "listen": "127.0.0.1",
      "protocol": "socks",
      "sniffing": {
        "enabled": true,
        "destOverride": [
          "http",
          "tls"
        ],
        "routeOnly": false
      },
      "settings": {
        "auth": "noauth",
        "udp": true,
        "allowTransparent": false
      }
    },
    {
      "tag": "http",
      "port": 10809,
      "listen": "127.0.0.1",
      "protocol": "http",
      "settings": {
        "timeout": 360
      }
    }
  ],
  "outbounds": [
    {
      "tag": "proxy",
      "protocol": "vless",
      "settings": {
        "vnext": [
          {
            "address": "103.21.244.67",
            "port": 443,
            "users": [
              {
                "id": "f179100e-a5c6-48c7-b691-c8e5b15e5c01",
                "email": "t@t.tt",
                "security": "auto",
                "encryption": "none"
              }
            ]
          }
        ]
      },
      "streamSettings": {
        "network": "ws",
        "security": "tls",
        "tlsSettings": {
          "allowInsecure": true,
          "serverName": "www1.485566.xyz",
          "fingerprint": "random"
        },
        "wsSettings": {
          "path": "/?ed=2560",
          "host": "www1.485566.xyz",
          "headers": {
            "Host": "www1.485566.xyz"
          }
        }
      },
      "mux": {
        "enabled": false,
        "concurrency": -1
      }
    },
    {
      "tag": "direct",
      "protocol": "freedom"
    },
    {
      "tag": "block",
      "protocol": "blackhole"
    }
  ],
  "routing": {
    "domainStrategy": "AsIs",
    "rules": [
      {
        "type": "field",
        "inboundTag": [
          "api"
        ],
        "outboundTag": "api"
      },
      {
        "type": "field",
        "outboundTag": "proxy",
        "domain": [
          "domain:googleapis.cn",
          "domain:gstatic.com"
        ]
      },
      {
        "type": "field",
        "port": "443",
        "network": "udp",
        "outboundTag": "block"
      },
      {
        "type": "field",
        "outboundTag": "direct",
        "ip": [
          "geoip:private"
        ]
      },
      {
        "type": "field",
        "outboundTag": "direct",
        "domain": [
          "geosite:private"
        ]
      },
      {
        "type": "field",
        "outboundTag": "direct",
        "ip": [
          "223.5.5.5",
          "223.6.6.6",
          "2400:3200::1",
          "2400:3200:baba::1",
          "119.29.29.29",
          "1.12.12.12",
          "120.53.53.53",
          "2402:4e00::",
          "2402:4e00:1::",
          "180.76.76.76",
          "2400:da00::6666",
          "114.114.114.114",
          "114.114.115.115",
          "114.114.114.119",
          "114.114.115.119",
          "114.114.114.110",
          "114.114.115.110",
          "180.184.1.1",
          "180.184.2.2",
          "101.226.4.6",
          "218.30.118.6",
          "123.125.81.6",
          "140.207.198.6",
          "1.2.4.8",
          "210.2.4.8",
          "52.80.66.66",
          "117.50.22.22",
          "2400:7fc0:849e:200::4",
          "2404:c2c0:85d8:901::4",
          "117.50.10.10",
          "52.80.52.52",
          "2400:7fc0:849e:200::8",
          "2404:c2c0:85d8:901::8",
          "117.50.60.30",
          "52.80.60.30"
        ]
      },
      {
        "type": "field",
        "outboundTag": "direct",
        "domain": [
          "domain:alidns.com",
          "domain:doh.pub",
          "domain:dot.pub",
          "domain:360.cn",
          "domain:onedns.net"
        ]
      },
      {
        "type": "field",
        "outboundTag": "direct",
        "ip": [
          "geoip:cn"
        ]
      },
      {
        "type": "field",
        "outboundTag": "direct",
        "domain": [
          "geosite:cn"
        ]
      }
    ]
  }
}然后进入v2ray的文件夹
chmod +x ./v2ray运行
./v2ray run这里默认前台运行,因为我要随时开关,所以再开一个终端做其他的事情
这样我们的代理软件就能在 http://127.0.0.1:10809 跑了
curl --proxy http://127.0.0.1:10809 https://www.youtube.com测试一下有正确回显说明我们代理软件没有问题,能跑通
理论上我们前面可以不用镜像源而是直接走代理,/etc/docker/daemon.json可以这样写
{
  "proxies": {
    "default": {
      "httpProxy": "http://127.0.0.1:10809",
      "httpsProxy": "http://127.0.0.1:10809"
    }
  }
}
两种方法都可以,因为我懒得每次都启动代理软件,所以直接配的镜像源
配置 Docker 守护进程代理
创建文件夹
mkdir -p /etc/systemd/system/docker.service.d创建配置文件
nano /etc/systemd/system/docker.service.d/http-proxy.conf复制粘贴
[Service]
Environment="HTTP_PROXY=http://127.0.0.1:10809"
Environment="HTTPS_PROXY=http://127.0.0.1:10809"
Environment="NO_PROXY=localhost,127.0.0.1"
重启Docker
sudo systemctl daemon-reload

sudo systemctl restart docker
测试登录
docker login -u <在DockerHub上注册的用户名>会让输入密码,无回显输入,如果没问题的话会返回Login Succeeded
至此,我们的Docker部分就配置好了
GZCTF
mkdir GZCTF && cd GZCTF

nano appsettings.json
填入以下信息
前三个尖括号中的内容必填,其他的可选
其中PublicEntry就是题目的域名(也可以直接填ip)
PublicEntry不是主站的域名,比如我搭了一个平台主站域名是https://gzctf.szuoj.cn,但是这里填的是
node.szuoj.cn,所以生成的题目链接就是node.szuoj.cn:随机端口
不建议填入主站域名,因为如果主站配置了SSL证书那么会默认 gzctf.szuoj.cn:随机端口 也用https而且是浏览器强制,需要更换没有访问过 https://gzctf.szuoj.cn 的浏览器才能访问 http://gzctf.szuoj.cn:随机端口
所以解决办法是两个域名都指向同一ip,这里填入题目域名
关于域名解析,如果服务器在国内未备案会被阻断连接,如果没有备案的话可以直接套一层CDN就行了
{
  "AllowedHosts": "*",

  "ConnectionStrings": {
    // 数据库连接:指向 db 服务
    "Database": "Host=db;Port=5432;Database=gzctf;Username=postgres;Password=<keykey>"
  },

  "XorKey": "<keykey>",
  // 用于加密挑战私钥,建议随机 16~32 字符

  "ContainerProvider": {
    "Type": "Docker",
    "PortMappingType": "Default",
    "EnableTrafficCapture": false,
    "PublicEntry": "<wwwwww>",
    // 外部访问地址,如 http://ctf.example.com 或 192.168.1.100
    "DockerConfig": {
      "SwarmMode": false,
      "Uri": "unix:///var/run/docker.sock"
    }
  },

  "EmailConfig": { /* 可选:邮件通知配置,测试环境可留空 */ },
  "CaptchaConfig": { "Provider": "None" },
  "ForwardedOptions": { /* 如需反向代理可配置 */ }
}配置docker-compose
nano compose.yml尖括号内容必填
POSTGRES_PASSWORD要与上面appsettings.json中的数据库密码一致
services:
  gzctf:
    image: registry.cn-shanghai.aliyuncs.com/gztime/gzctf:develop
    restart: always
    environment:
      - "GZCTF_ADMIN_PASSWORD=<Your GZCTF_ADMIN_PASSWORD>"
      # choose your backend language `en_US` / `zh_CN` / `ja_JP` ...
      - "LC_ALL=zh_CN.UTF-8"
    ports:
      - "80:8080"
    volumes:
      - "./data/files:/app/files"
      - "./appsettings.json:/app/appsettings.json:ro"
      # - "./kube-config.yaml:/app/kube-config.yaml:ro" # this is required for k8s deployment
      - "/var/run/docker.sock:/var/run/docker.sock" # this is required for docker deployment
    depends_on:
      - db

  db:
    image: postgres:alpine
    restart: always
    environment:
      - "POSTGRES_PASSWORD=<Your POSTGRES_PASSWORD>"
    volumes:
      - "./data/db:/var/lib/postgresql/data"
运行
docker compose up -d这里默认在80端口开启了服务,如果没配域名的话到时候直接访问ip就能打开了,如果对于反向代理有需求的话可以接着看
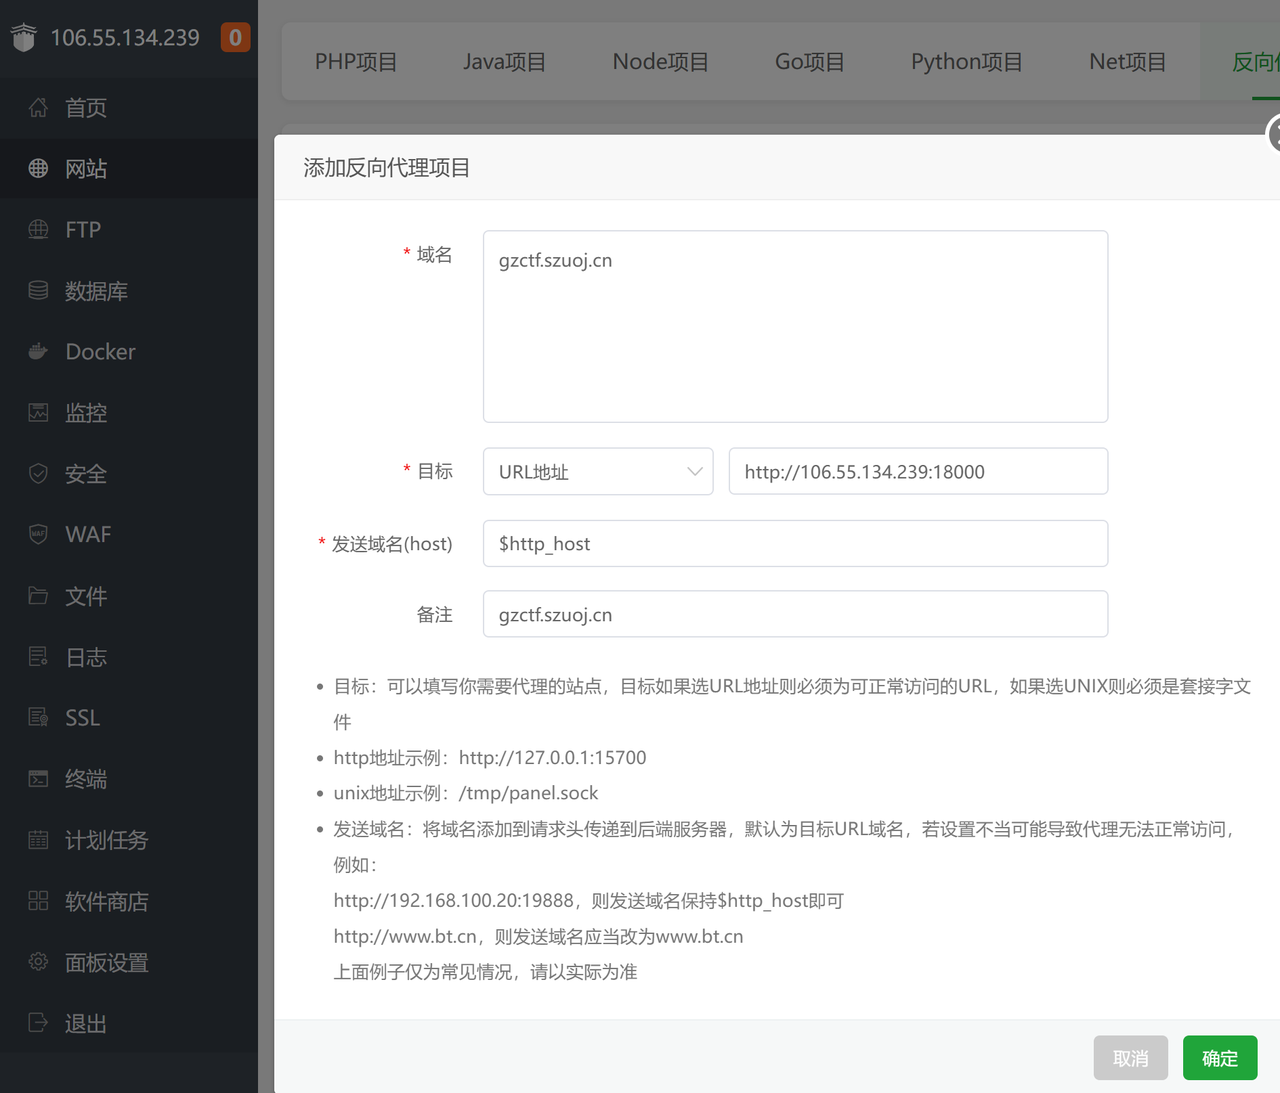
反向代理
我把上面的
ports:
      - "80:8080"
改成了
ports:
      - "18000:8080"
即使用18000端口
然后在宝塔面板配置反向代理
然后去申请免费SSL证书
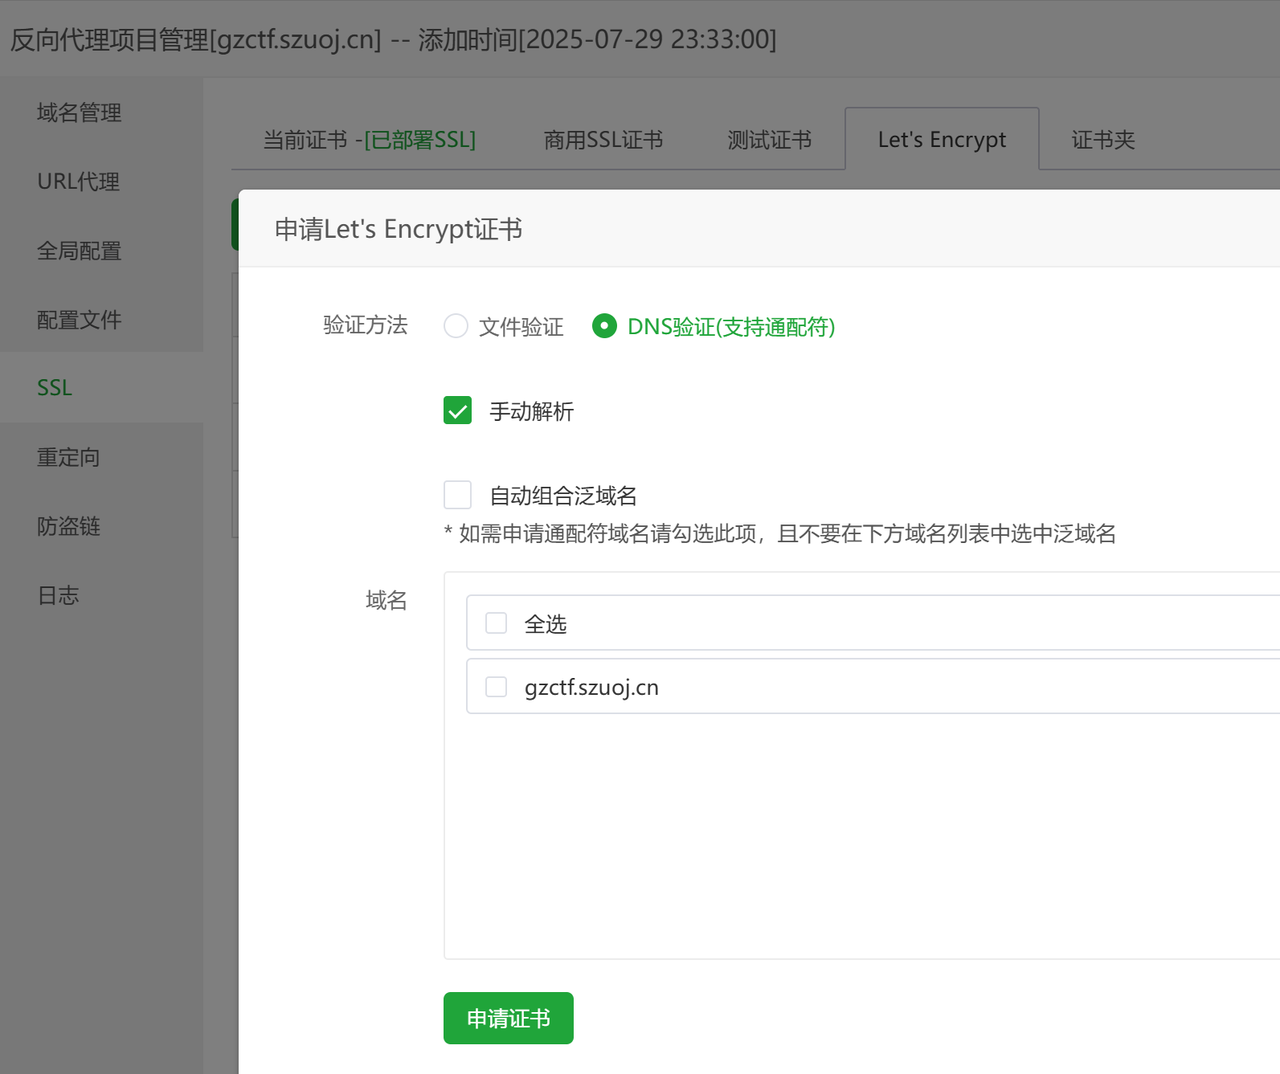
按步骤给域名添加txt解析进行验证即可
上题
设置管理员
官方文档:
生产环境中默认不存在管理员权限用户,需要在首次启动时设置 GZCTF_ADMIN_PASSWORD 环境变量来设置初始管理员密码,并通过 Admin 账号登录。
你也可以通过手动更改数据库条目来将当前已注册的用户设置为管理员。当管理员注册完成并成功登录后,改数据库表:
docker compose exec db psql -U postgres

\c gzctf

UPDATE "AspNetUsers" SET "Role"=3 WHERE "UserName"='your_admin_user_name';
这样就将一个已注册用户升级为了管理员
以管理员账号登录后可以用UI界面设置其他用户为管理员
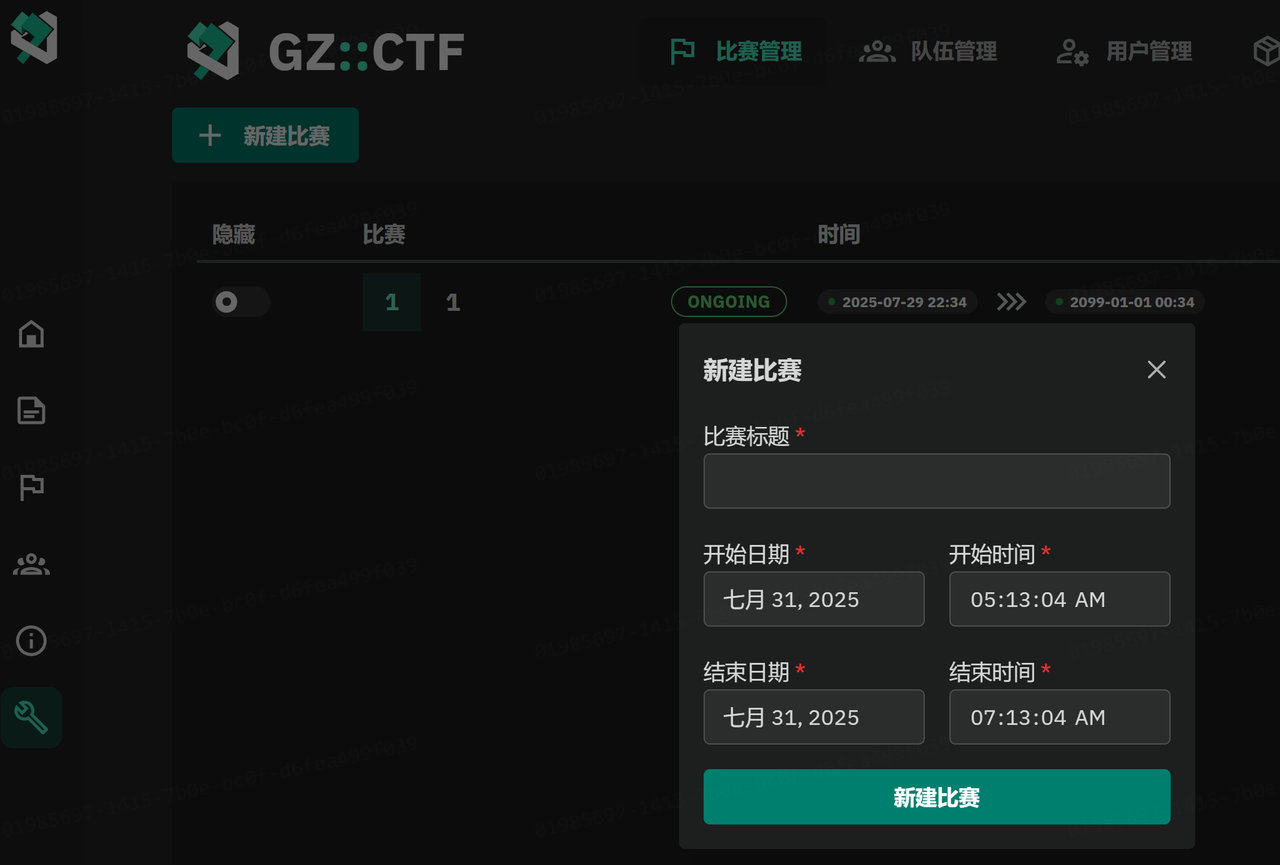
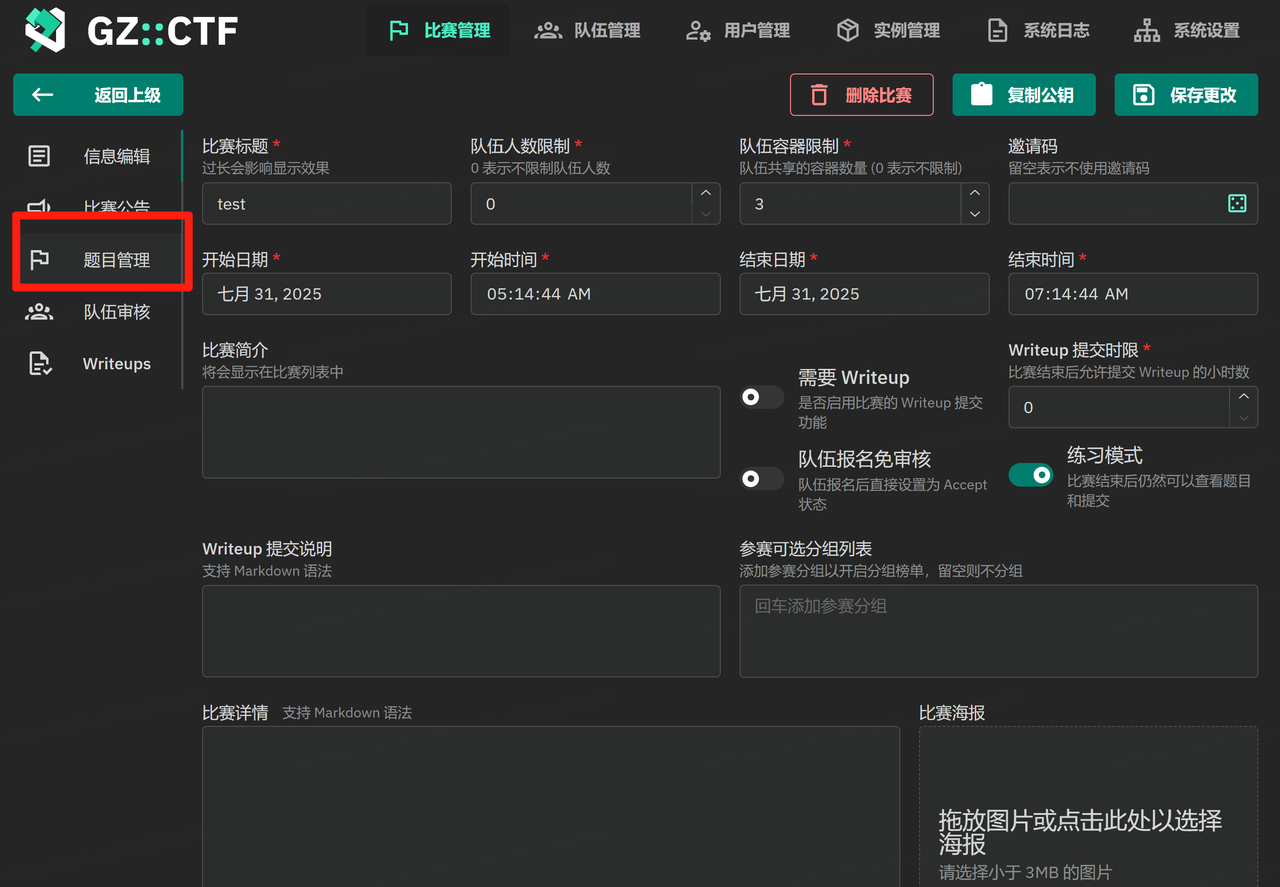
新建比赛
使用管理员账号登录后会在左侧看到扳手🔧
新建比赛
点击题目管理上题
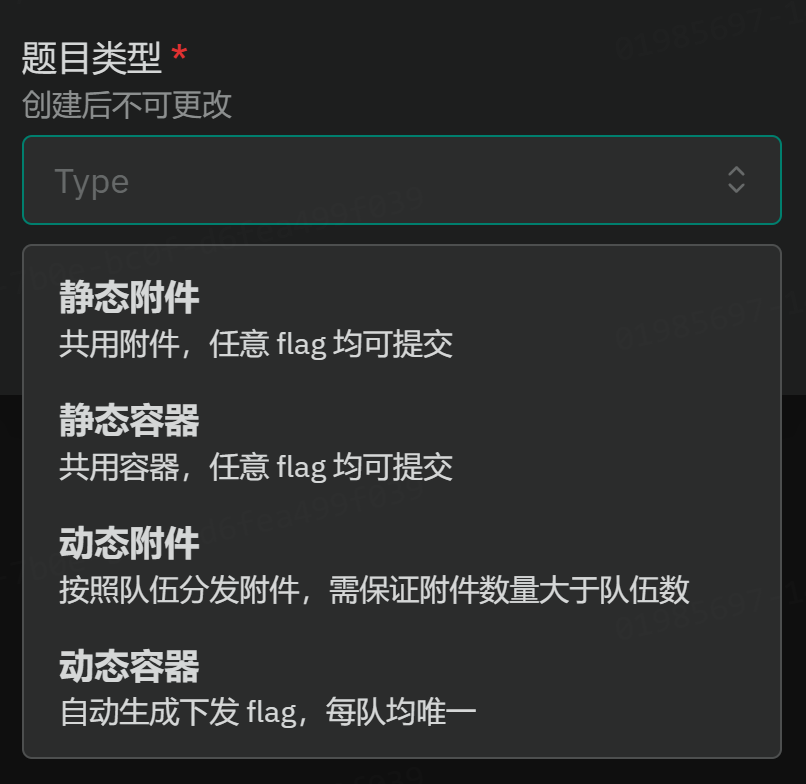
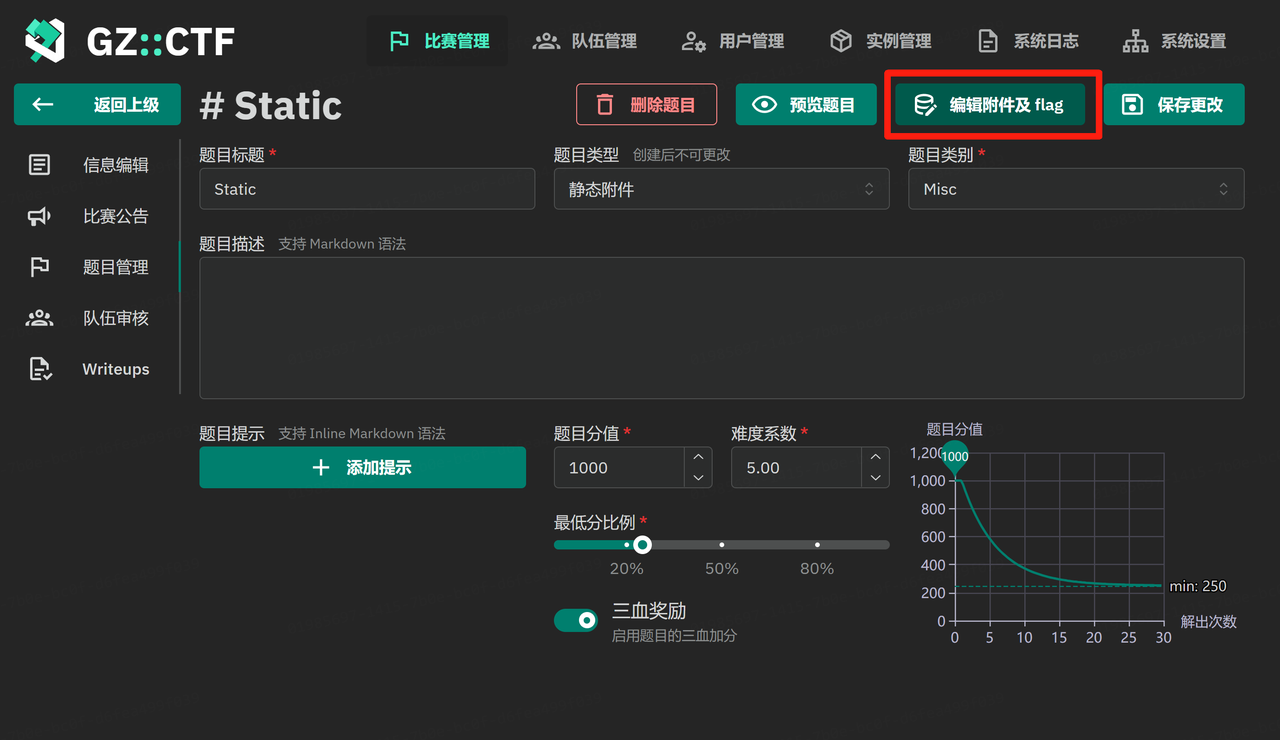
新建题目,选择题目类别和题目类型
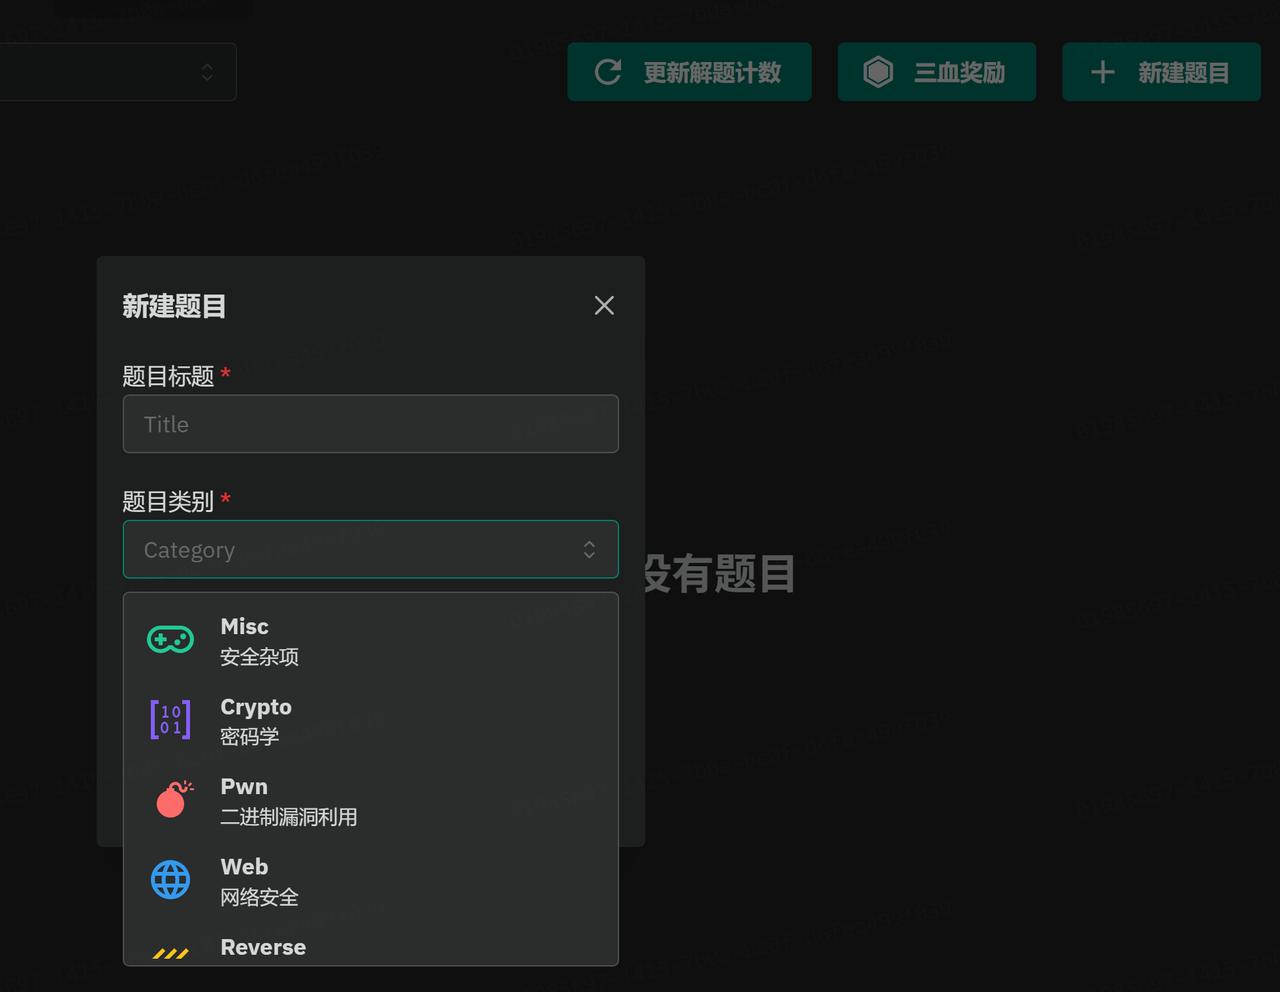
题目类别还有区块链,数字取证,渗透测试,移动安全,硬件安全,人工智能等
稍后会详细讲一下Web和Pwn的动态flag的实现
静态附件
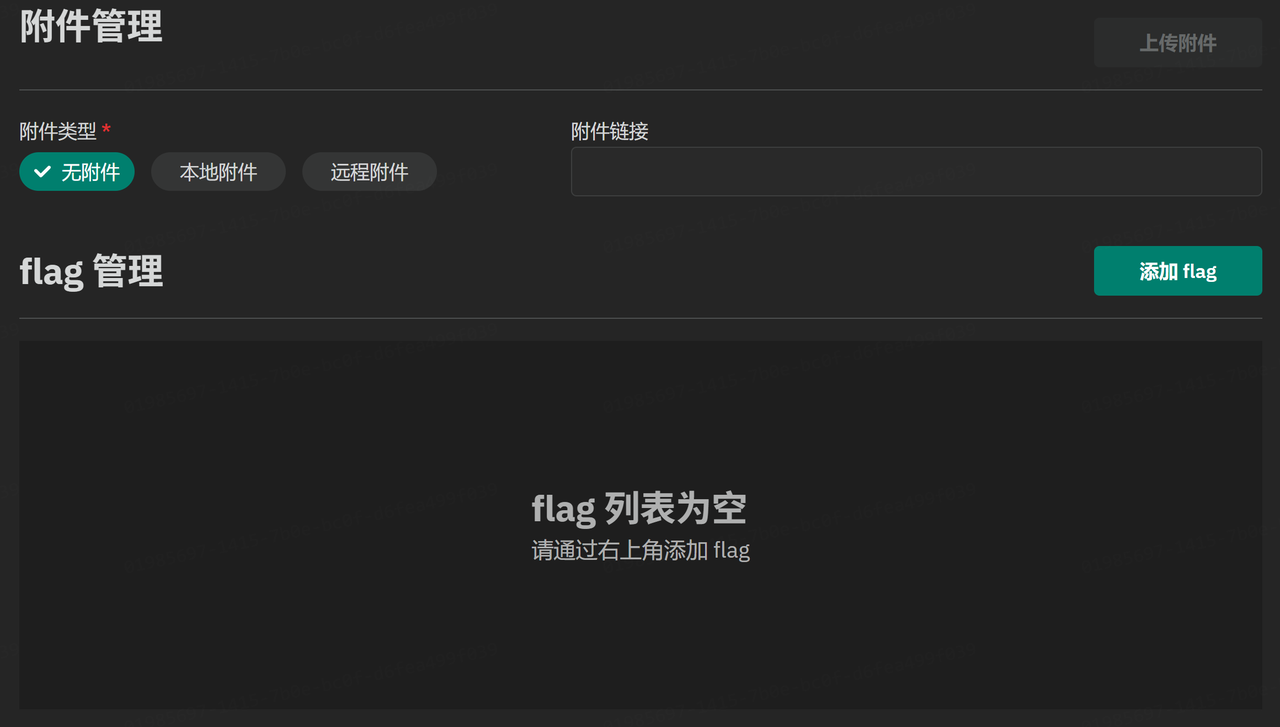
静态容器
新增了容器镜像
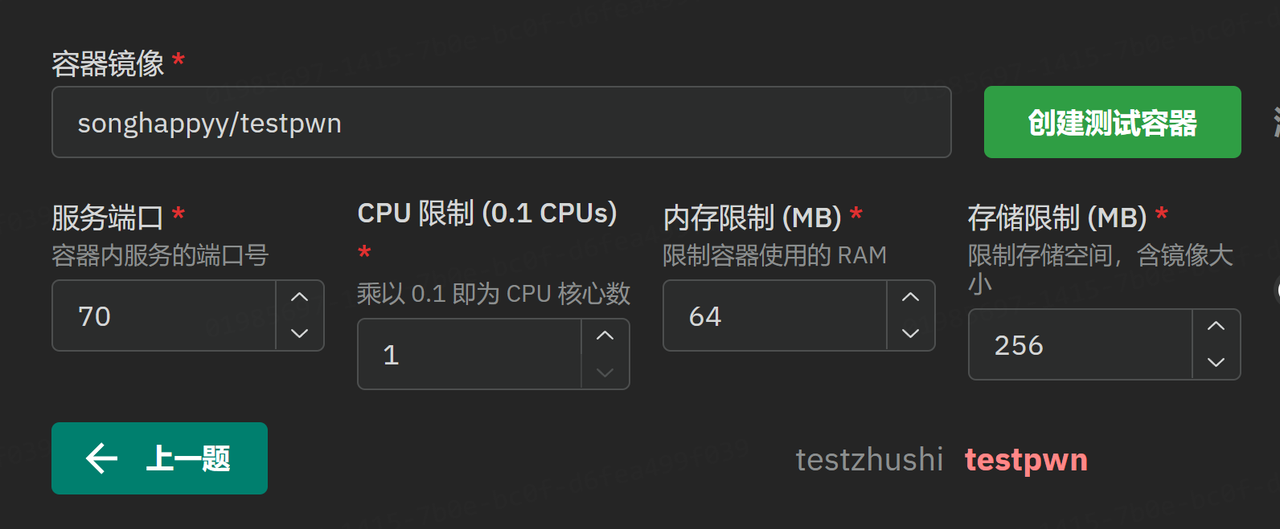
填入镜像名称即可,比如我在DockerHub push了一个镜像是songhappyy/test,填入即可,可以先创建测试容器,没问题即可保存
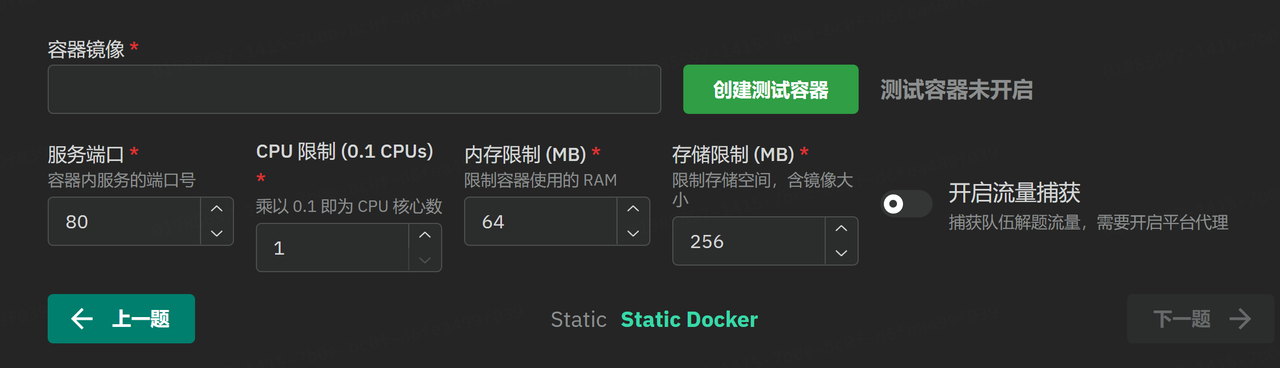
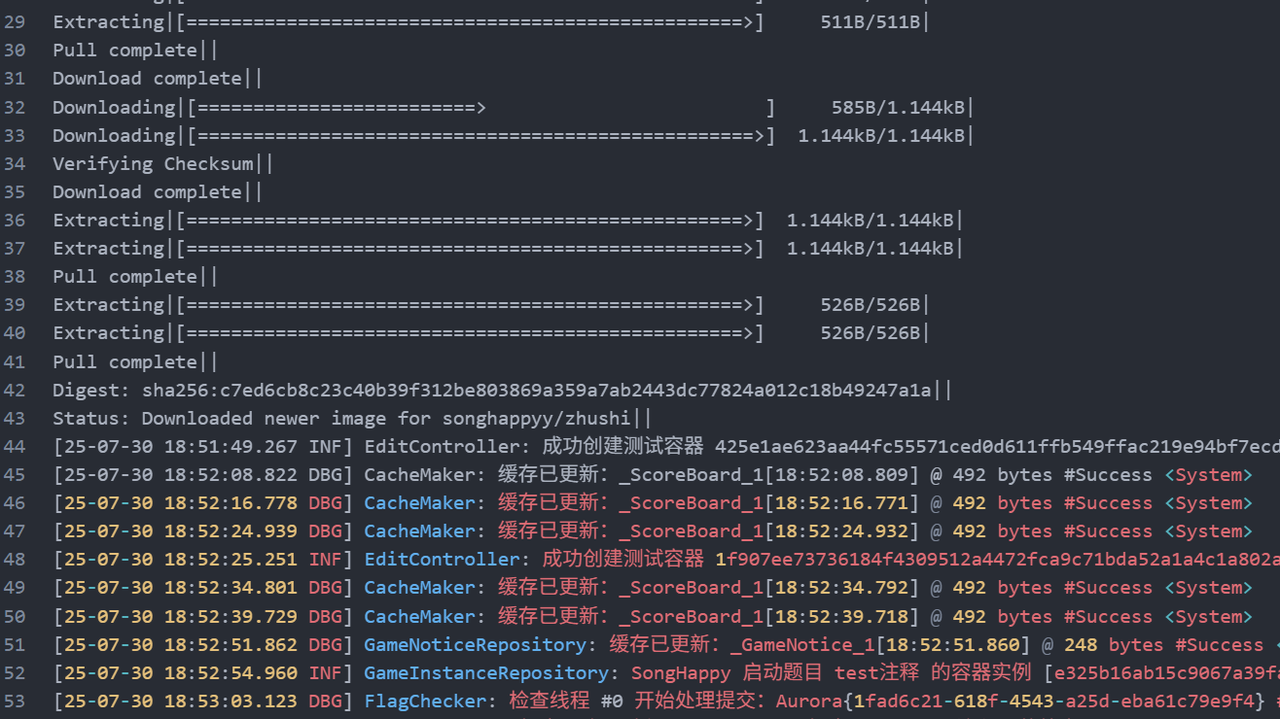
拉取进度可以看gzctf-gzctf-1这个容器的日志
flag部分同静态附件
动态附件
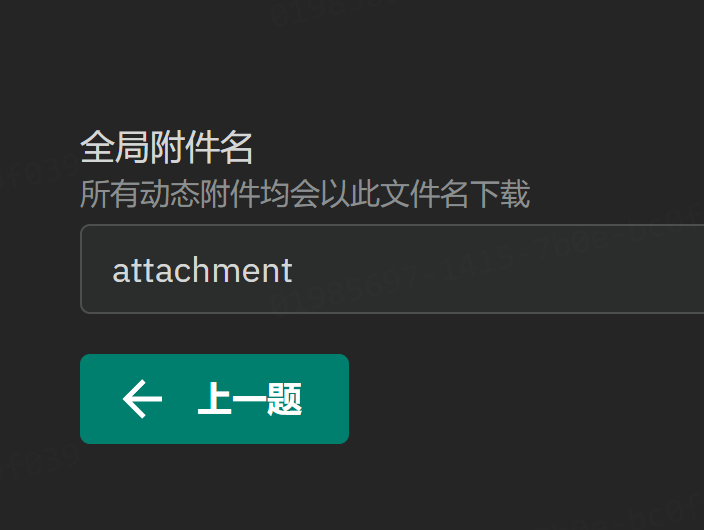
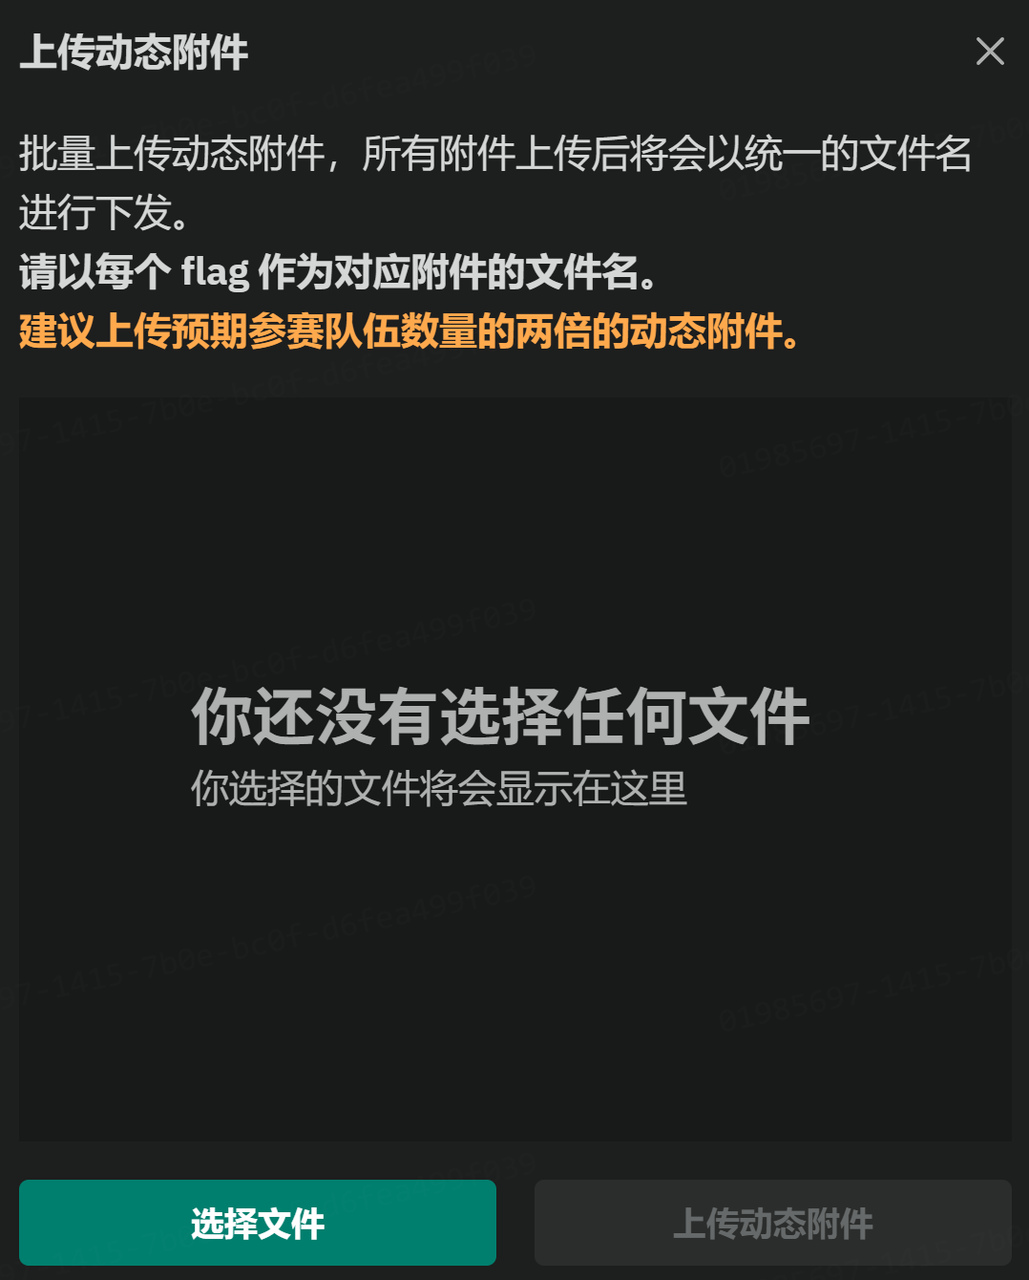
其余和静态附件一样
动态容器
镜像导入和静态容器一样
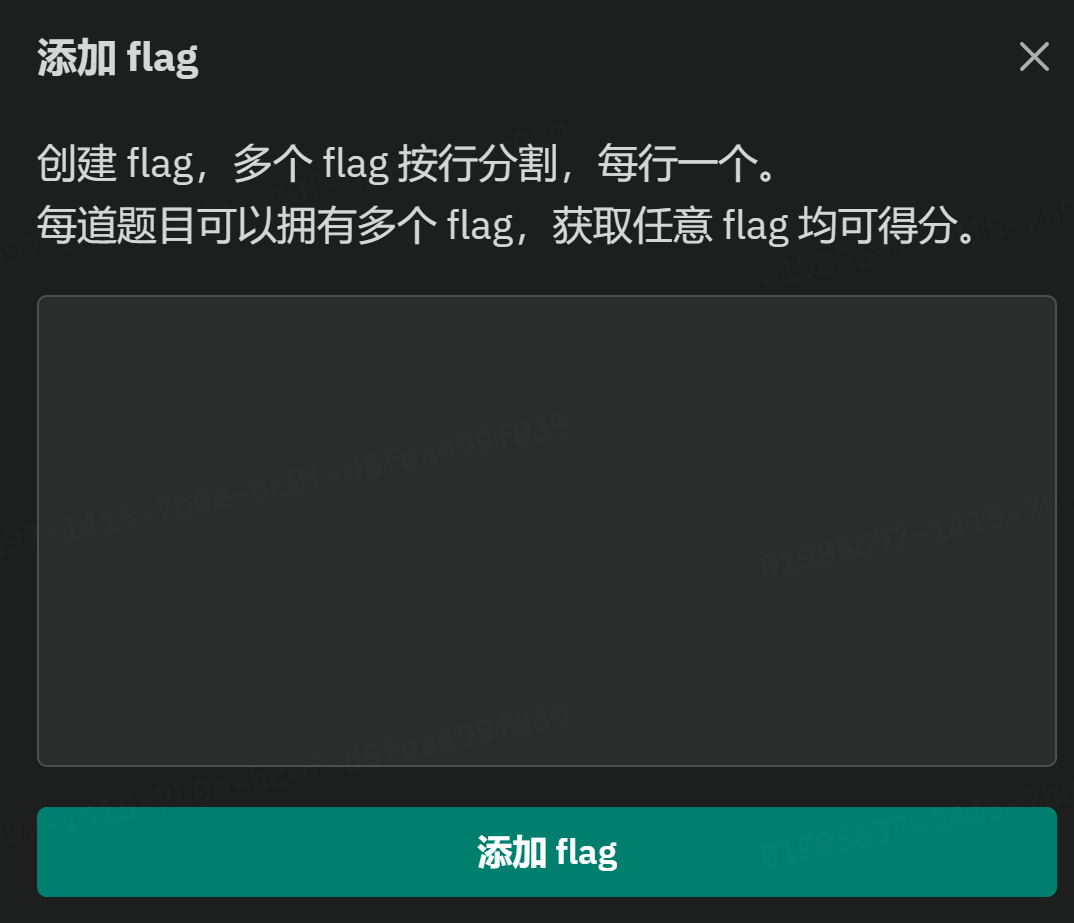
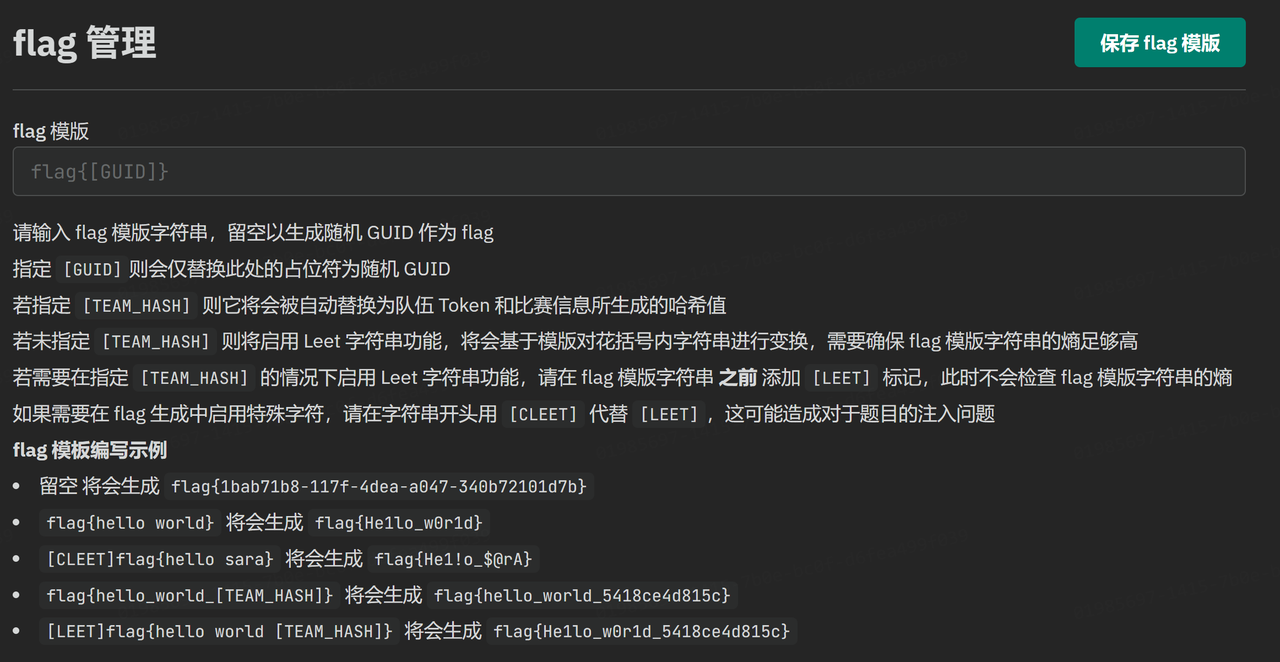
关于flag,一般情况下在flag模版处填入Aurora{[GUID]}即可
动态容器-Web
flag在环境变量GZCTF_FLAG
举个例子
用这个php做例子
index.php
<?php
show_source(__FILE__);
$id=$_REQUEST['id'];
eval($id);
?>
Dockerfile
# 指定基础镜像
FROM php:7.0-fpm-alpine

# 删除默认的 web 根目录中的所有内容
RUN rm -rf /var/www/html/*

# 创建空的 flag 文件并设置权限
RUN touch /flag && chmod 666 /flag

# 将本地的 html 目录复制到容器中
COPY . /var/www/html

# 将初始化脚本复制到容器的 html 目录中
COPY init.sh /var/www/html/init.sh

# 设置权限(此时仍为 root 用户)
RUN chown -R www-data:www-data /var/www/html && chmod -R 755 /var/www/html

# 设置初始化脚本为可执行
RUN chmod +x /var/www/html/init.sh

# 暴露 web 服务器的端口
EXPOSE 80

# 以 root 用户启动脚本
ENTRYPOINT ["/var/www/html/init.sh"]

# 切换到 www-data 用户执行后续命令
USER www-data
init.sh
#!/bin/sh

# 将环境变量 GZCTF_FLAG 的值写入 flag
export flag="$GZCTF_FLAG"

# 清除 GZCTF_FLAG 环境变量
unset GZCTF_FLAG

# 启动 PHP 服务器并替换当前 shell 进程
exec php -S 0.0.0.0:80 -t /var/www/html &

# 等待 PHP 服务器启动
sleep 5

# 删除 init.sh 脚本
rm -f "$0"

# 保持脚本运行
wait
这样就实现了把原来的以GZCTF_FLAG命名的flag重命名为flag变量
如果不介意环境变量中的flag的名字是GZCTF_FLAG可以直接用下面这种Dockerfile(就不需要init.sh了)
# 基础镜像:轻量的PHP 7.0 CLI环境(Alpine系统,体积小)
FROM php:7.0-cli-alpine

# 清理容器默认的web根目录(避免残留文件干扰)
RUN rm -rf /var/www/html/*

# 将本地当前目录的所有文件复制到容器的web根目录(/var/www/html)
COPY . /var/www/html

# 设置目录权限(确保PHP进程有权限读取文件,www-data是PHP默认运行用户)
RUN chown -R www-data:www-data /var/www/html && chmod -R 755 /var/www/html

# 暴露80端口(PHP服务器将监听此端口对外提供服务)
EXPOSE 80

# 启动PHP内置Web服务器(前台运行,确保容器持续活跃)
# -S 0.0.0.0:80:监听所有网卡的80端口
# -t /var/www/html:指定web根目录为/var/www/html
CMD ["php", "-S", "0.0.0.0:80", "-t", "/var/www/html"]
打包并推送
<xxx>表示要更改为自己的
docker build -t <username>/<continer_name> .docker login -u <username>
<password>docker push <username>/<continer_name>然后到时候在动态容器部分镜像填入<username>/<continer_name>就可以了
按照flag存放的位置分类,init.sh可以这样写
环境变量
#!/bin/sh

# 将环境变量 GZCTF_FLAG 的值写入 flag
export flag="$GZCTF_FLAG"

# 清除 GZCTF_FLAG 环境变量
unset GZCTF_FLAG

# 启动 PHP 服务器并替换当前 shell 进程
exec php -S 0.0.0.0:80 -t /var/www/html &

# 等待 PHP 服务器启动
sleep 5

# 删除 init.sh 脚本
rm -f "$0"

# 保持脚本运行
wait
根目录
#!/bin/sh

# 将环境变量 GZCTF_FLAG 的值写入 /flag 文件
echo "$GZCTF_FLAG" > /flag

# 清除 GZCTF_FLAG 环境变量
unset GZCTF_FLAG

# 启动 PHP 服务器并替换当前 shell 进程
exec php -S 0.0.0.0:80 -t /var/www/html &

# 等待 PHP 服务器启动
sleep 5

# 删除 init.sh 脚本
rm -f "$0"

# 保持脚本运行
wait
网页注释
#!/bin/sh

# 将环境变量 GZCTF_FLAG 的值写入 /flag 文件
echo "$GZCTF_FLAG" > /flag

# 清除 GZCTF_FLAG 环境变量
unset GZCTF_FLAG

FLAG=$(cat /flag)
sed -i "s/flag{test_flag}/${FLAG}/" /var/www/html/index.php

# 启动 PHP 服务器并替换当前 shell 进程
exec php -S 0.0.0.0:80 -t /var/www/html &

# 等待 PHP 服务器启动
sleep 5

# 删除 init.sh 脚本
rm -f "$0"

# 保持脚本运行
wait
<!DOCTYPE html>
<html lang="zh-CN">
<head>
<meta charset="utf-8">
<title>Dynamic Flag PHP 题目</title>
</head>
<!-- flag{test_flag} -->
<body>
<?php echo "<h1>你的 flag 隐藏在 HTML 注释中,查看源代码</h1>"; ?>
</body>
</html>待补充
关于其他位置的探索大家可以在此补充
动态容器-Pwn
我不会pwn所以直接从网上搬来了一个 web和pwn题的简单动态flag实现_gzctf-CSDN博客
文件:pwn
FROM ubuntu:16.04

RUN sed -i "s/http:\/\/archive.ubuntu.com/http:\/\/mirrors.tuna.tsinghua.edu.cn/g" /etc/apt/sources.list && \
    apt-get update && apt-get -y dist-upgrade && \
    apt-get install -y lib32z1 xinetd

RUN useradd -m ctf

WORKDIR /home/ctf

RUN cp -R /lib* /home/ctf && \
    cp -R /usr/lib* /home/ctf

RUN mkdir /home/ctf/dev && \
    mknod /home/ctf/dev/null c 1 3 && \
    mknod /home/ctf/dev/zero c 1 5 && \
    mknod /home/ctf/dev/random c 1 8 && \
    mknod /home/ctf/dev/urandom c 1 9 && \
    chmod 666 /home/ctf/dev/*

RUN mkdir /home/ctf/bin && \
    cp /bin/sh /home/ctf/bin && \
    cp /bin/ls /home/ctf/bin && \
    cp /bin/cat /home/ctf/bin

COPY ./ctf.xinetd /etc/xinetd.d/ctf
COPY ./flag.sh /flag.sh
RUN echo "Blocked by ctf_xinetd" > /etc/banner_fail

RUN chmod +x /flag.sh

COPY ./bin/ /home/ctf/
RUN chown -R root:ctf /home/ctf && \
    chmod -R 750 /home/ctf && \
    chmod 740 /home/ctf/flag

CMD ["/flag.sh"]

EXPOSE 70
service ctf
{
disable = no
socket_type = stream
protocol = tcp
wait = no
user = root
type = UNLISTED
port = 70
bind = 0.0.0.0
server = /usr/sbin/chroot
# replace helloworld to your program
server_args = --userspec=1000:1000 /home/ctf ./pwn #pwn为二进制可执行文件的文件名
banner_fail = /etc/banner_fail
# safety options
per_source = 10 # the maximum instances of this service per source IP address
rlimit_cpu = 20 # the maximum number of CPU seconds that the service may use
#rlimit_as = 1024M # the Address Space resource limit for the service
#access_times = 2:00-9:00 12:00-24:00
}目录结构及文件内容
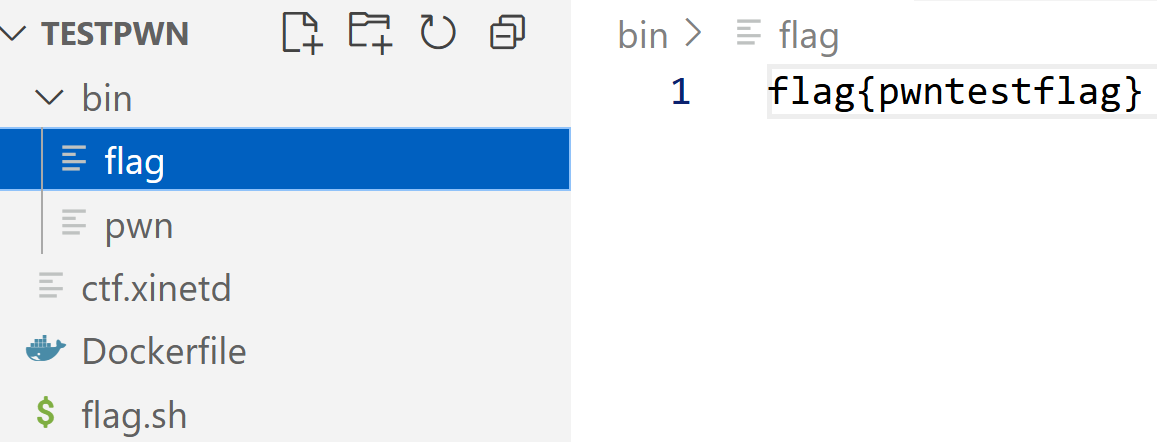
上题时注意这里端口号是70
以上这些测试题目(4Web+1Pwn)的源码 challenges.zip